Scrapbook Borders: Simple Edges You Can Make by Hand
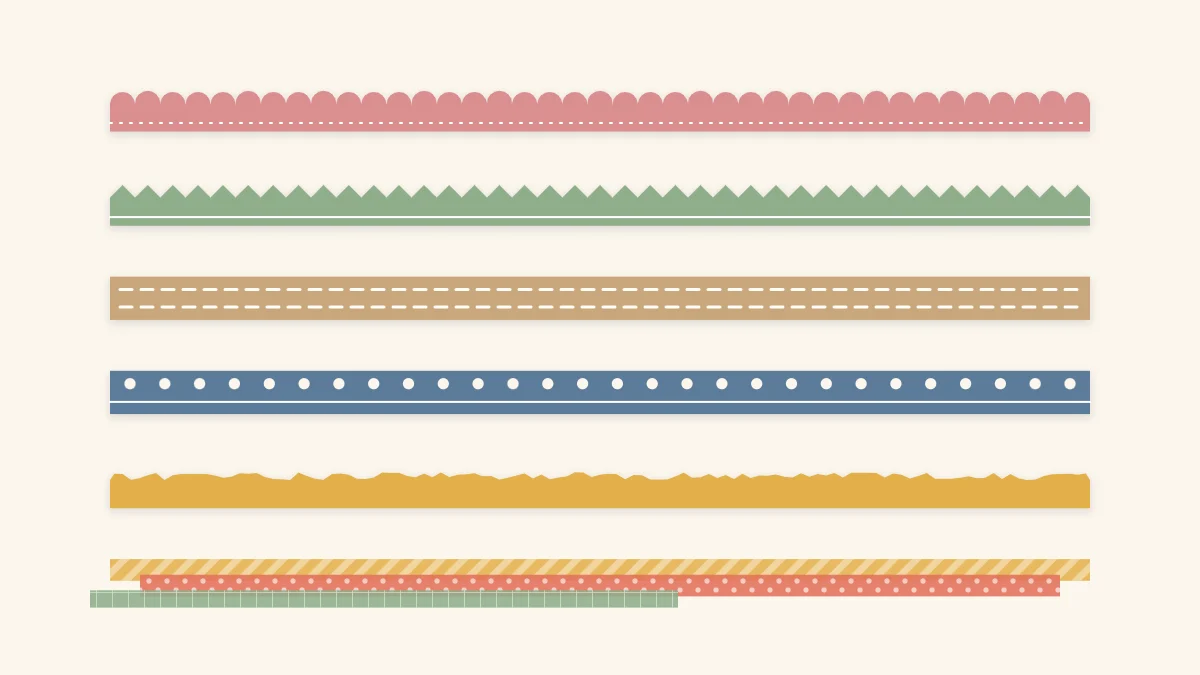
Six page borders made from a strip of cardstock or tape: scalloped, zigzag, stitched, punched, torn and washi. Includes how to space the repeats and where a border belongs.
Tutorial at a glance
Materials
- cardstock strips
- pencil and ruler
- sharp scissors
- small round object for tracing
- hole punch
- washi tape
- tape runner
Scrapbook borders are strips of paper, tape or stitching that run along one edge of a page or across it. A border gives a layout a clear boundary, repeats a color from the photos and fills a bare edge without adding another large element. All of the borders below can be made by hand with scissors, a pencil and a strip of cardstock.
The strip itself is simple. What makes a border look finished is an even repeat and a width that suits the page.
Six borders at a glance
| Border | Tools | Look | Difficulty |
|---|---|---|---|
| Scalloped | Pencil, round object, scissors | Soft, playful | Easy |
| Zigzag | Ruler, pencil, scissors | Crisp, energetic | Easy |
| Stitched | Piercing tool, needle, floss | Textured, handmade | Intermediate |
| Punched | Hole punch, ruler | Light, lacy | Easy |
| Torn edge | Hands, ruler | Casual, rustic | Easy |
| Layered washi tape | Washi tape, scissors | Colorful, flat | Easy |
Start with a straight strip
Every paper border begins as a strip cut the full width of the page, so 12 in (30.5 cm) long for a 12 x 12 in page. A paper trimmer gives the cleanest result; keep fingers behind the blade. For a shaped edge, cut the strip about 1 1/2 in (4 cm) wide so there is room to cut into one side and still leave a solid band on the other.
Long offcuts are ideal here. If you keep leftovers sorted by size, the strips pile is where borders come from; see the notes on using leftover cardstock.
Scalloped and zigzag edges
Both of these depend on dividing the strip into equal units before cutting. Uneven scallops are the most common fault, and they come from drawing freehand.
- Turn the strip face down and rule a light pencil line along its length, about 1/2 in (1.3 cm) from one edge. This is the depth of the shaped edge.
- Mark equal intervals along that line. On a 12 in strip, marks every 1 in (2.5 cm) give twelve repeats with no partial shape at either end.
- For scallops, trace around a small round object such as a coin or bottle cap between each pair of marks, so each curve starts and ends on the line. For a zigzag, mark the midpoint of each interval on the strip edge and join the points with a ruler.
- Cut along the drawn shapes with sharp scissors, turning the paper and not the scissors on the curves.
- Erase stray pencil and turn the strip face up.
Tip
If the page width does not divide evenly by your round object, choose a slightly smaller or larger one instead of squeezing in a half scallop. A border that ends on a complete shape at both sides looks planned.
Stitched and punched strips
A stitched border is a row of small dashes of floss sewn through a strip. Pierce the holes first, evenly spaced along a ruled line, with the strip resting on a foam mat. Then sew a running stitch through them and tape the thread ends flat on the back. Piercing before sewing matters because pushing a needle through unpierced cardstock bends and creases it. Piercing tools and needles are sharp, so work away from your fingers and supervise children. The full method is in the guide to hand stitching on paper.
A punched border uses a standard hole punch. Rule a line near one edge, mark equal intervals and punch at each mark. Back the strip with a contrasting color so it shows through the holes. Save the punched dots for another page.
Torn edges and washi tape
For a torn border, lay a ruler along the strip and tear the paper up against it in short pulls. Many cardstocks have a white core, so tearing toward yourself exposes a pale ragged band and tearing away hides it. Test on a scrap to see which face you prefer. The article on distressing and inking paper covers tearing direction in more detail.
A washi tape border needs no cutting at all. Run two or three tapes side by side across a cardstock strip, slightly overlapping, with the widest at the bottom. Build it on a separate strip and not directly on the page, so a crooked line can be peeled and redone without marking the background.
Placing a border on the page
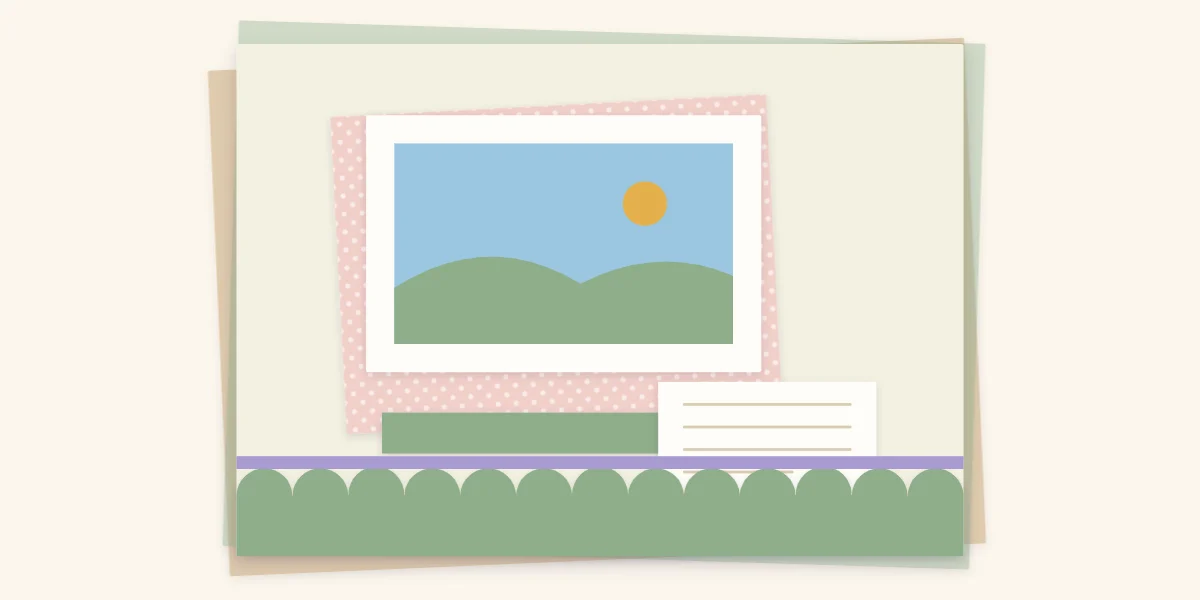
The bottom edge is the safest position. A border there acts like a floor: it gives the photo and title something to sit above and adds visual weight low on the page, which feels stable. A scalloped strip along the bottom with the curves pointing up, topped by a thin plain strip in a second color, makes a finished base for a single photo and a title strip.
That thin strip, about 1/4 in (6 mm) wide, covers the straight edge of the shaped border and separates it from the rest of the layout. Without it, a decorative edge can run straight into the background and look unfinished.
Other positions work on the same logic:
- Top edge: lighter than a bottom border; keep it narrow so the page does not feel top-heavy.
- One side: a vertical border on the outer edge frames a column of photos.
- Across the middle: a border under a row of photos works as a shelf.
Keep a border narrower than the focal photo is tall, and use one decorative border per page. Two different shaped edges compete; a shaped edge plus a plain strip cooperate. For the reasoning behind visual weight and balance, see the guide to page composition.
Problems and fixes
- Scallops drift in size: the intervals were not marked. Cut a new strip, mark first.
- Border lifts at the ends: adhesive stopped short. Run the tape runner right to both ends.
- Border overpowers the photo: it is too wide or too bright. Trim the solid band narrower or switch to a color already in the photo.
- Strip is too short: butt two pieces together and hide the join under a photo mat or an embellishment.
Watch out
Leave the binding edge of the page clear. A thick border under the holes or strap area can stop the page from sitting flat in the album.
Frequently asked questions
How wide should a scrapbook border be?
On a 12 x 12 in page, a finished border between about 1 and 2 in (2.5 to 5 cm) wide usually sits comfortably. Keep it clearly narrower than the focal photo is tall, and go narrower still on smaller pages so the border supports the photo instead of competing with it.
How do you cut even scallops without a punch?
Rule a line along the back of the strip, mark equal intervals on it and trace a small round object between each pair of marks. Cutting along traced curves keeps every scallop the same size. Choose an interval that divides the strip length evenly so there is no partial shape at the ends.
Should a border go on every page?
No. A border is useful when a page has a bare edge or needs a visual base, and unnecessary when photos or paper bands already reach the edges. On a spread, running the same border across both pages helps them read as one design.