Scrapbook Tags: How to Make and Use Them on a Page
Tags add a layer, a writing spot and a sense of direction to a layout. Learn the common shapes, how to cut a classic tag by hand and where to place it.

Tutorial at a glance
Materials
- cardstock offcuts
- pencil and ruler
- scissors or paper trimmer
- hole punch
- twine or narrow ribbon
- tape runner or glue stick
Scrapbook tags are small shaped pieces of cardstock with a hole at one end, borrowed from the plain luggage label. On a page they do three jobs at once: they add a layer, they give you a place to write, and they point the eye toward the photo they sit next to. Because a tag is small, it is also one of the easiest embellishments to cut yourself from paper you already own.
A tag works best when it has a reason to be there. One tag tucked behind the focal photo with a date on it reads as part of the design. Five tags dotted around the page read as clutter.
Tag shapes and what each one suits
Every tag starts as a simple shape with a hole near one end. What changes is the outline, and the outline decides how the tag behaves on the page.
| Shape | How it is cut | Good for |
|---|---|---|
| Classic | Rectangle with two top corners clipped | Journaling, dates, tucking behind photos |
| Round | Circle, hole near the edge | Small accents inside a cluster |
| Arrow | Rectangle with one end cut to a point | Pointing at a photo or a detail |
| Ticket | Rectangle with small curved notches at the corners | Travel and event pages |
| Bookplate | Wide rectangle with shaped ends | Holding a short title or label |
| Flag | Rectangle with a V notch cut into one end | Layering at the edge of a mat |
If you only make one kind, make the classic: its long straight sides sit neatly against a photo edge.
What you need
Cardstock is the right material because text-weight paper curls once it is handled and will not hold a hole without tearing. Offcuts are ideal, so check your leftover pile first; the guide to using paper scraps explains how to sort them so tag-sized pieces are easy to find. Beyond the paper you need a pencil, a ruler, scissors or a paper trimmer, a hole punch and something to thread through the hole: twine, narrow ribbon or embroidery floss.
A useful starting size for a 12 x 12 in (30.5 x 30.5 cm) page is about 2 x 4 in (5 x 10 cm). Scale it down for smaller pages.
How to cut a tag by hand
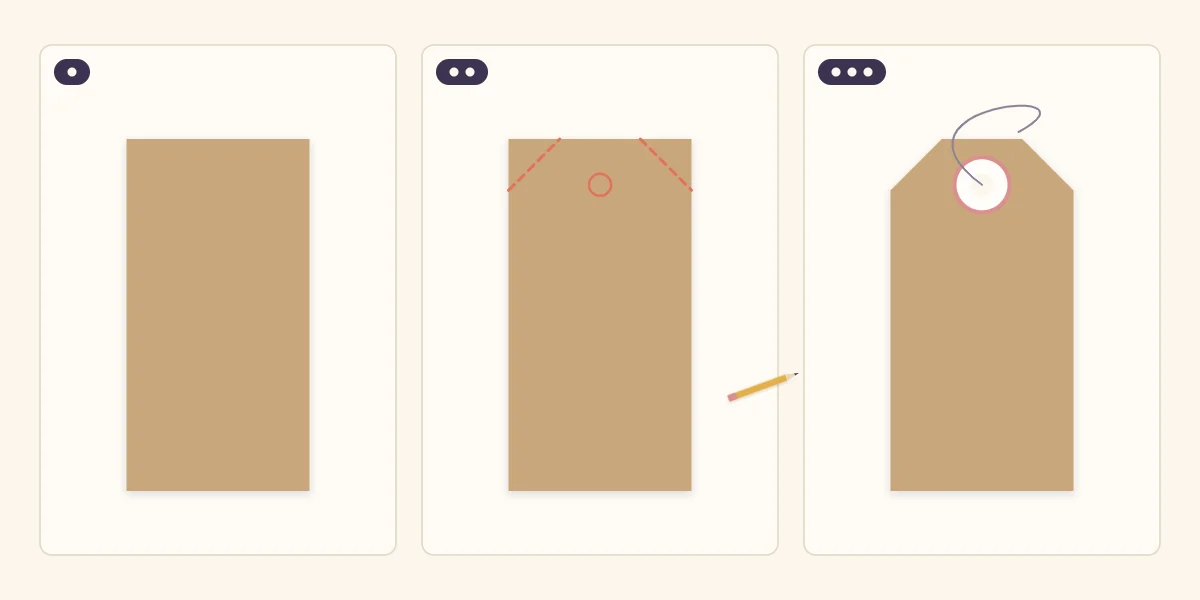
The classic tag takes three stages: a rectangle, two marked corners, and the finished piece with its hole.
- Cut the rectangle. Measure and cut a clean rectangle from cardstock. Use a paper trimmer if you have one, since the long sides need to be parallel for the tag to look deliberate. Keep fingers behind the blade.
- Mark the two top corners. At one short end, measure the same distance in from each corner along the top edge and down each side, about 1/2 in (1.3 cm) on a tag this size. Join each pair of marks with a light diagonal pencil line. Matching measurements on both sides are what keep the tag symmetrical.
- Clip, punch and reinforce. Cut along both diagonals. Punch a hole centered between the clipped corners, far enough from the top edge that there is solid paper above it. Glue a small paper ring around the hole to reinforce it, then erase any pencil that still shows.
The reinforcement ring is more than decoration: the hole is the weakest point of the tag, and a second layer of paper there resists tearing.
Tip
Cut one tag from scrap cardstock and keep it as a template. Tracing around it is faster than measuring each time, and every tag on the page will come out the same size.
Decorating a tag without overloading it
A tag is a small surface, so one or two additions are enough. Reliable options include:
- A strip of patterned paper across the bottom third, leaving the rest plain for writing.
- A second, slightly smaller tag in a contrasting color glued on top so a narrow border shows.
- A band of washi tape wrapped around the lower end.
- Lightly inked edges, which make a pale tag stand out against a pale background.
- One small paper flower or button near the hole.
For the tie, fold a short length of twine in half, push the loop through the hole and pull the ends through it. Keep ties flat; bulky bows press into the facing page.
Where to place tags on a page
The most dependable placement is tucked halfway behind a matted photo. Slide the tag under one edge so roughly half of it shows, with the hole end pointing outward. The tag then looks anchored instead of floating, and it extends the photo’s shape in one direction, which helps lead the eye toward the title or journaling.
A second, smaller tag works well as the bottom layer of a cluster. Put it down first, then build paper flowers on top so only one end peeks out. Keep both tags in the same color family, and angle them only a few degrees; a steep tilt looks accidental.
Tags can also slip into flat pockets, where they can be pulled out and read, or be layered among other handmade embellishments cut from the same sheet.

Using tags for journaling
A tag is a ready-made journaling spot for short notes: a date, a place, a few lines about what was happening. Rule faint pencil lines before writing and erase them once the ink is dry. Write on the tag before you glue it down, so a mistake costs one small piece of cardstock and not the whole layout. For more on fitting words into small areas, see the article on journaling placement.
Problems and fixes
- Lopsided corners: the two diagonals were measured differently. Trim both again using the same marks.
- Torn hole: it sits too close to the edge. Cover it with a reinforcement ring, or cut a new tag.
- Tag overpowers the photo: it is too large or too bright. Cut it smaller, or tuck more of it out of sight.
- Tag disappears: it matches the background. Mat it on a darker color or ink the edges.
Watch out
Metal eyelets and thick knots sit directly against whatever is on the facing page. Keep raised pieces away from the spot where a photo on the opposite page will rest.
Frequently asked questions
What size should a scrapbook tag be?
There is no fixed size, but a tag should be clearly smaller than the photo it sits beside. About 2 x 4 in (5 x 10 cm) is a comfortable starting point on a 12 x 12 in page. Scale it down for smaller pages and for tags used inside a cluster.
Can tags be made from patterned paper?
Yes, but thin patterned paper bends easily and the hole tears quickly. Glue the patterned paper to cardstock first, then cut the tag from the doubled sheet. Choose a quiet pattern if you plan to write on it.
How do you stop the hole in a tag from tearing?
Punch the hole far enough from the top edge that solid paper surrounds it, then glue a small paper ring around it as reinforcement. Keep the tie loose and flat so nothing pulls on the hole when the page is handled.